Showing posts with label survival kit. Show all posts

Wednesday, November 7, 2012

ALREADY AT IT!!

http://www.chicagotribune.com/news/sns-rt-us-arms-treaty-unbre8a627j-20121107,0,2655886.story

According to this article hours after the election the UN passed a vote to start talks about the Gun ban treaty back up in march 2013. Russia sadly was the only nation to oppose it. This is a clear stepping stone into our lives to allow the UN disarmament teams to come to your door and take your weapons. Once the UN has control of our guns there will be nothing stopping them to take control of our lives and government. If this treaty passes which it will Obama and Clinton already said they will sign it when it first came up earlier in the year I see a break out of Militias and possible civil war as the most likely option. This regime has been setting the stage to convince week minded sheeple that this will be a good idea from the start mainly with the Fast and Furious operations where THEY gave the firearms to CRIMINALS on purpose just to use it as a backing for this treaty! Don't let them fool you this regime is a cold calculating extremely smart one. Also the youth has been being indoctrinated with union lackey teachers to mold them into a complacent nanny government dependent nation. No nation especially Japan in WW2 would have dreamed of invading mainland America due to the armed civilian population which in a situation like that would be a HUGE force multiplier for the military but once the UN takes our guns it will be up to the government that gave them our guns and freedoms to protect us. By law of common sense is the most backasswards thinking you can have but unfortunately it is the thinking that has been ingrained in the coming of age generations. Buy now stock pile now and consider other options. Black powder has come a long ways since the 1800's takes no time to load and easy and cheap to stockpile necessary ammo and ammo can be forged when manufacturing stops. Bows and crossbows are cheap to maintain and stockpile needed supplies. A broad-head will penetrate light body armor with no problem and they are silent, not to mention you can make your own bolts easily. Live your life as normal in the day and in the shadows prep! DON'T let on to what you have and where you have it cached at! Join forces with a couple other preppers in your local area. work out a combined effort plan for O Shit scenarios, split the cost and work needed to be ready. More articles will follow in a series I plan on doing on prepping and steps needed as well as a tactical thinking article. 

Friday, August 10, 2012

Wednesday, July 25, 2012

DIY Survival Alcohol Burning Gas Jet Stove {Guest Post}


DIY Survival Alcohol Burning Gas Jet Stove

{This is a guest post from my buddies blog. Being able to boil water to remove harmful bacteria and micro organisms is a must in any disaster/survival scenario as well as being able to heat up your food. A hot  meal is always a moral booster in any situation. This light weight easy to make stove will accomplish this. The other plus side is that all the materials you need you probably have laying around your house already. Thanks to Eddie for making the how-to.  ~ Dustin}


I have been reading on some of the Prep-er pages, Survival, and yes even some of the Zombie Apocalypse pages. I came across some very cool DIY light weight  stoves, for camping or survival  situations. I liked quite a few of them . This Alcohol Burning Gas Jet Stove was very interesting to me, their version was made from a Bud Lite aluminum bottle. 

So I decided to construct my own. I decided to use a Oliver's Peach Hard Cider aluminum bottle since I didn't have or drink Bud Lite . These aluminum bottles are much sturdier than the aluminum soda can that many of the Micro stoves are made from. So they made a much more durable stove that is not as apt to be crushed in you pack.
Not sure if any of you have tried this but it is pretty good. Kind of dangerous, you can drink quite a few of these very quickly without tasting the alcohol.

Steps:

     Step 1: To begin with you will need a marker, some JB Weld, and some thing to measure with.

      Step 2: Start with a mark at the height you want the stove to be. I chose 2 1/2 inches and placed a mark there with the marker.

      Step 3:   The next cut will be for the inside of the stove, this needs to start right where the bottle becomes straight coming down from the neck. It is important to make sure this is exactly at that point.

    Step 4:  Measure from the mark in step 2 to a point up the neck at 2 1/4 inches. This is taking into account for the indent in the bottom of the bottle about a 1/4 inch.
Step 5:    This step is to cut the bottle on the marks just made. I used my miter saw with a  metal cutting blade. Be sure to wear eye protection when making these cuts the bits of aluminum I am sure would not be good in the eyes.
 

    Step :5:  The blade will leave the edges rough so they will have to be smoothed out.


I use a 4 way file and sand paper to do this. you have to make sure that you get all the burrs off the pieces. Also you want to rough up the out side edge of the neck of the bottle and the the inside edge of the bottom of the bottle.


 These will show how I roughed up the mating surfaces on the two pieces so that the JB Weld will get a tight grip.


This is why I said earlier to make sure you cut the top of the bottle exactly where the bottle starts to straighten. I missed by that much and here is the result.
Luckily I had another bottle to cut. This time I was more careful and this is the result.
      Step 6: You can see in the photo above the weep holes at the bottom these allow alcohol to seep under the flue for lack a better choice of words. I cut these with the file .


   Step 7: Now mix up a small batch of JB Weld , I used JB Weld instead of epoxy because it has a higher heat rating. Mix until well blended then apply a small amount around the out side edge of the flue.


   Step 8: Next place the flue into the base, ensure that the flue is seated in the bottom of the base. It helped me to turn upside down and press with my hand ,then tap to set with a hammer and a block of wood.


Step 9: Turn upside down and weight for 24 hours. I turn it upside down to insure that as it sets up the weld will flow toward the top and create a good seal. This will also keep it from flowing down to where in the next step we will drill the jet holes.


 Step 10:  Now after waiting the 24 hour time to set, we will drill the jets. I used a 1/16th drill bit to drill these with. I drilled these holes 1 inch down from the top. I drilled 18 hole evenly around the stove. 


I used a piece of masking tape to lay out the holes around the bottle. Ok you probably noticed that it is a different color can. Well I did not want to wait the 24 hrs for it to set up before making this post, so I used the original stove I made that is in the video at the end. kind of like the cooks on TV put the dish in the top oven and pull the finished one out of the bottom.


 That is the way I made it and it works pretty good.

It boiled the water in this water chestnut can in just about two min. I had to relight the stove once because I didn't give it enough time to heat up. The alcohol has to boil before it will give off the gas that comes out of the jets. You might have to blow it just a bit to get the jets lit. The alcohol is a blue flame and can't be seen in day light, you can see the heat waves coming from the flame. Be very careful , this is a very hot stove and the heat rises a foot or so above the stove. So do not bend over to smell the food, take it off the fire first. Make sure to let the stove cool completely before refueling, and never attempt to refuel while it is burning.

The stove also put out a lot of heat to the sides , it would be practical for winter scenario in that it would provide heat for yourself as well as cook your food.

Saturday, July 7, 2012

Natural Wonders by ~Rebecca McPhate


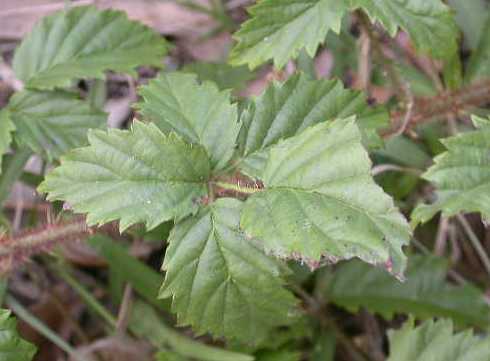
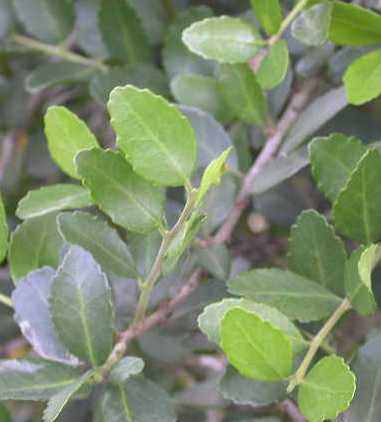
Blackberry brambles a nuisance?  Yaupon bushes unruly?  To some, these may be unsightly but, if you research your local native flora you may be really surprised and the unruly bush may suddenly become a treasured, more practical yard addition than maybe that imported, invasive species.  
The benefit of xeriscaping (the use of native plants in landscaping) not only saves a ton of time and money, but can also yield some other little-known pleasures.  Native species attract beneficial insects that kill off the invasive ones (yes, there ARE good bugs!) and most native plants have a natural resistance to drought.  If you enjoy butterflies many native plants can be used in place of a store-bought import.  When choosing your plants, develop a mentality like you would when shopping for material items – “Made in the USA”…better yet, narrow that down to regional.  There are many field guides and books in general that highlight invasive as well as native and better yet – the culinary uses of what may be found right in that unsightly weedy lot behind your house and most also have medicinal uses!  
The simplest of pleasures is a nice soothing hot drink after a long day.   When using the flora of your natural surroundings you also develop a better appreciation for the wonder of nature.  It is a great feeling when you can go out and enjoy what is naturally provided without even having to plant it, feed it or obsess over its care - also NOT having to buy from a grocery store.  Here are a few simple, most readily available things you can try today –
Blackberry Tea:  Pick blackberry leaves (after berries are done!) gently wash in cool water without bruising, pat dry.  If you have a dehydrator, lay leaves out on racks and dry slowly to a nice crumbly-crisp texture.  Oven users, lay leaves on a cookie sheet, set oven to about 200* and bake until dry and crumbly – not burnt!  I try to leave the leaves whole so I can use them in a tea-ball but you can also add them directly to a cup of hot water and then pour through a paper towel, coffee filter or small-hole strainer to remove the leaves.  Use about 2 teaspoons of dried leaves per one cup of boiling water, sweeten (local made/sold honey?) if desired and enjoy!   Store unused leaves in air-tight container (I use a recycled spice jar).  If dried and stored properly the leaves can be kept and used whenever you wish.  If you have raspberry growing naturally – follow these same steps.
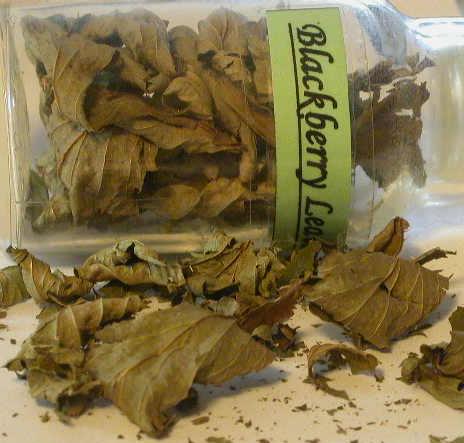
Blackberry

Medicinal Uses for Blackberry: Tea made from the leaves, root and even bark (I have only tried and tested leaves) can be cooled and used as an astringent to treat cuts and burns, when used as a drinking tea it can sooth intestinal upsets of diarrhea and dysentery. Chew the fresh green leaves for swollen gums/throat ailments.


Yaupon Tea:  A very little known diamond in the rough- I was shocked to learn that this native wonder is one of only three species that are natural producers of caffeine other than coffee!  However, be very careful - it got its name for a reason – “Ilex Vomitoria” – the little red berries were used by natives as a purging agent and can cause severe sickness.   This is a wonderful plant and can be easily “tamed” by pruning and easily adapted into a yards landscape as a hedge or let it grow into an attractive winter outdoor tree to provide berries for the native bird species.  In the wild, it is an essential part of the winter diet of the deer.  Ever look closely at the outer leaves and see the ends nibbled away?  Deer.  Anyway, pick the new leaves, vibrant light green the older darker leaves can be very bitter.  It is essential to dry these, do not use raw!  Wash fresh picked leaves, blot dry and dry them as described in the blackberry preparation until they are a nice deep-golden “crunchy” brown.  They do not provide as much caffeine as coffee but it is natural and makes a nice hot cup of tea.  To me, the flavor and appearance is that of green tea.
Other uses of Yaupon Holly:  Very informative! http://plants.usda.gov/plantguide/pdf/cs_ilvo.pdf
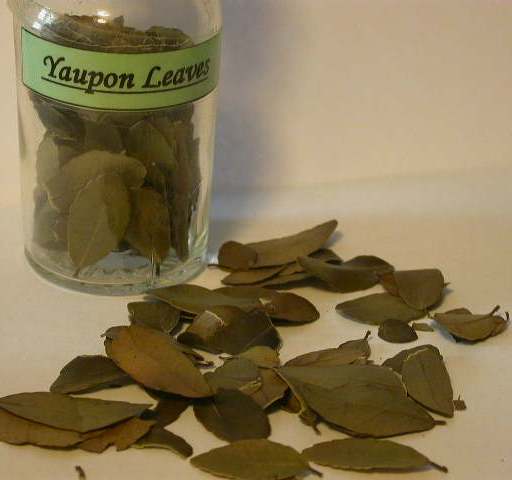
Yaupon Holly


Blueberry leaf tea:  Not so readily available here in Texas but something I loved when I was out hunting in the mountains of the extreme North –You might have these plants growing wild or you can buy one to grow if you are in the proper zone for them to thrive.  Pick leaves, wash and steep in hot water.  No need to dry the leaves first, enjoy them fresh!   After being out all day hunting/hiking, on the way back to camp I would pick the leaves and the first thing I would do when we returned to camp was put the water pot back on the fire so I could relax with the soothing soft flavor of the berry that this plant provides.  


Medicinal uses of Blueberry: So many to list but here is a very informative page that gives them ALL!  Headache, intestinal, eyesight, gas, glaucoma, on and on and on… http://www.botanical-online.com/english/medicinalblueberry.htm
The best breakfast I have ever had is that which was made over an open campfire.  Do you have one of those percolator pots that always percolate coffee grounds into your pot of coffee?   Well, I do not have a remedy for that particular problem but I DO have a solution for bitter coffee or no milk for toning down that bitterness…eggshells.  You can save up egg shells at home to take in your camp gear or when making your campfire breakfast, after you crack your eggs open, toss the shells into the percolator (in the liquid, not with the grounds) and let ‘er brew.  Makes a smooth, creamy, non-bitter pot of camp coffee.
Hope you enjoy trying these simple natural pleasures…Whether out on the trail or on the patio, before you attack that annoying “weed” that keeps coming back…grab your regional native plant book to identify it, then research all you can, most of what you will find are the BENEFITS that it is persistently trying to provide.
As always – if you do not know for certain what it is – DO NOT EAT IT!  Some native plants may be edible but some are beneficial in completely other ways and are NOT TO BE EATEN OR CONSUMED IN ANY WAY.  If you cannot identify with certainty from your field guide book, take a sample cutting into your extension office, master gardeners, or even a park ranger for proper ID.  When in doubt, leave it alone!
Meanwhile, I will be out exploring, gathering and conjuring.  Maybe next go-round we will make our own flour (for those campfire pancakes!) from another often overlooked source…more to come!  
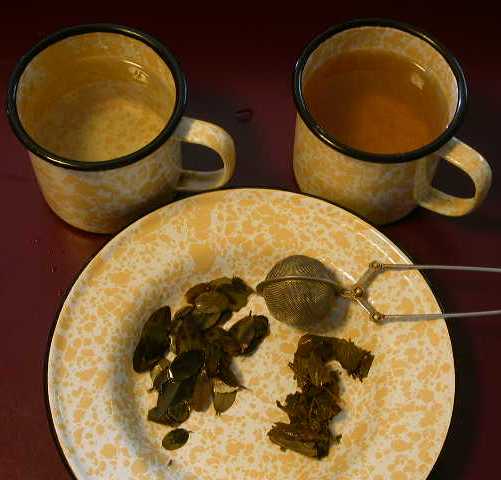
Tea Time!  Yaupon Tea on left  Blackberry Tea on right

~Rebecca McPhate TimmEarthly_Epona@msn.com


Here are some book titles on Amazon that I have read and keep in my own personal library- before buying always check first with your public library in the regional/state section!
Native Alternatives to Invasive Species
ISBN: 978-1889538778
A Field Guide to Edible Wild Plants: Eastern and central North America (Peterson Field Guides)
ISBN: 978-0395926222

A Field Guide to Medicinal Plants and Herbs: Of Eastern and Central North America (Peterson Field Guides)

ISBN: 978-0395988145

How to Get Your Lawn off Grass: A North American Guide to Turning Off the Water Tap and Going Native

ISBN: 978-1550172591

Sunday, April 1, 2012

Improvised fish hooks (Guest Article)


Today I am going teach you how to make fishing hooks from the stuff around you. Start looking around for suitable thorns to use. In this article I will be using Wild Orange Thorns. The sharpest and sturdiest the better. Be careful not to dull the sharp tip of the thorns because this makes the hook so much more effective. I started by scraping the thin bark layer off my thorns this is not necessary, You can see how the tree has allowed the tip of the thorn to die so that it is harder and sharper. You need to find the strongest thorn branch possible, look for it to be thick at the base (next to the branch) and thin at the tip the thorns should be facing up. you could whittle it at the top for the string to fit and stay in place.
The thorn in the picture is not attached to the wood...but you could stick it to the wood with a very small amount of Pine tree resin or other glue to make binding the thorn less fiddly
Make a length of very thin cordage or you can just use a plain length of some kind of strong fiber or even a shoelace. Put the thorn through a loop knot on the end of the cordage. Hopefully the following pictures explain themselves and show how to bind the thorn to the wood.
 Continue wrapping the string around the stem of the hook and then to finish it off pass the end underneath the last couple of wraps and pull tight

Finished hook... It would have been better to carve the top of the hook so that it is easier to attach the line. Have fun!