Showing posts with label hiking. Show all posts

Wednesday, July 25, 2012

DIY Survival Alcohol Burning Gas Jet Stove {Guest Post}


DIY Survival Alcohol Burning Gas Jet Stove

{This is a guest post from my buddies blog. Being able to boil water to remove harmful bacteria and micro organisms is a must in any disaster/survival scenario as well as being able to heat up your food. A hot  meal is always a moral booster in any situation. This light weight easy to make stove will accomplish this. The other plus side is that all the materials you need you probably have laying around your house already. Thanks to Eddie for making the how-to.  ~ Dustin}


I have been reading on some of the Prep-er pages, Survival, and yes even some of the Zombie Apocalypse pages. I came across some very cool DIY light weight  stoves, for camping or survival  situations. I liked quite a few of them . This Alcohol Burning Gas Jet Stove was very interesting to me, their version was made from a Bud Lite aluminum bottle. 

So I decided to construct my own. I decided to use a Oliver's Peach Hard Cider aluminum bottle since I didn't have or drink Bud Lite . These aluminum bottles are much sturdier than the aluminum soda can that many of the Micro stoves are made from. So they made a much more durable stove that is not as apt to be crushed in you pack.
Not sure if any of you have tried this but it is pretty good. Kind of dangerous, you can drink quite a few of these very quickly without tasting the alcohol.

Steps:

     Step 1: To begin with you will need a marker, some JB Weld, and some thing to measure with.

      Step 2: Start with a mark at the height you want the stove to be. I chose 2 1/2 inches and placed a mark there with the marker.

      Step 3:   The next cut will be for the inside of the stove, this needs to start right where the bottle becomes straight coming down from the neck. It is important to make sure this is exactly at that point.

    Step 4:  Measure from the mark in step 2 to a point up the neck at 2 1/4 inches. This is taking into account for the indent in the bottom of the bottle about a 1/4 inch.
Step 5:    This step is to cut the bottle on the marks just made. I used my miter saw with a  metal cutting blade. Be sure to wear eye protection when making these cuts the bits of aluminum I am sure would not be good in the eyes.
 

    Step :5:  The blade will leave the edges rough so they will have to be smoothed out.


I use a 4 way file and sand paper to do this. you have to make sure that you get all the burrs off the pieces. Also you want to rough up the out side edge of the neck of the bottle and the the inside edge of the bottom of the bottle.


 These will show how I roughed up the mating surfaces on the two pieces so that the JB Weld will get a tight grip.


This is why I said earlier to make sure you cut the top of the bottle exactly where the bottle starts to straighten. I missed by that much and here is the result.
Luckily I had another bottle to cut. This time I was more careful and this is the result.
      Step 6: You can see in the photo above the weep holes at the bottom these allow alcohol to seep under the flue for lack a better choice of words. I cut these with the file .


   Step 7: Now mix up a small batch of JB Weld , I used JB Weld instead of epoxy because it has a higher heat rating. Mix until well blended then apply a small amount around the out side edge of the flue.


   Step 8: Next place the flue into the base, ensure that the flue is seated in the bottom of the base. It helped me to turn upside down and press with my hand ,then tap to set with a hammer and a block of wood.


Step 9: Turn upside down and weight for 24 hours. I turn it upside down to insure that as it sets up the weld will flow toward the top and create a good seal. This will also keep it from flowing down to where in the next step we will drill the jet holes.


 Step 10:  Now after waiting the 24 hour time to set, we will drill the jets. I used a 1/16th drill bit to drill these with. I drilled these holes 1 inch down from the top. I drilled 18 hole evenly around the stove. 


I used a piece of masking tape to lay out the holes around the bottle. Ok you probably noticed that it is a different color can. Well I did not want to wait the 24 hrs for it to set up before making this post, so I used the original stove I made that is in the video at the end. kind of like the cooks on TV put the dish in the top oven and pull the finished one out of the bottom.


 That is the way I made it and it works pretty good.

It boiled the water in this water chestnut can in just about two min. I had to relight the stove once because I didn't give it enough time to heat up. The alcohol has to boil before it will give off the gas that comes out of the jets. You might have to blow it just a bit to get the jets lit. The alcohol is a blue flame and can't be seen in day light, you can see the heat waves coming from the flame. Be very careful , this is a very hot stove and the heat rises a foot or so above the stove. So do not bend over to smell the food, take it off the fire first. Make sure to let the stove cool completely before refueling, and never attempt to refuel while it is burning.

The stove also put out a lot of heat to the sides , it would be practical for winter scenario in that it would provide heat for yourself as well as cook your food.

Saturday, July 7, 2012

Natural Wonders by ~Rebecca McPhate


Blackberry brambles a nuisance?  Yaupon bushes unruly?  To some, these may be unsightly but, if you research your local native flora you may be really surprised and the unruly bush may suddenly become a treasured, more practical yard addition than maybe that imported, invasive species.  
The benefit of xeriscaping (the use of native plants in landscaping) not only saves a ton of time and money, but can also yield some other little-known pleasures.  Native species attract beneficial insects that kill off the invasive ones (yes, there ARE good bugs!) and most native plants have a natural resistance to drought.  If you enjoy butterflies many native plants can be used in place of a store-bought import.  When choosing your plants, develop a mentality like you would when shopping for material items – “Made in the USA”…better yet, narrow that down to regional.  There are many field guides and books in general that highlight invasive as well as native and better yet – the culinary uses of what may be found right in that unsightly weedy lot behind your house and most also have medicinal uses!  
The simplest of pleasures is a nice soothing hot drink after a long day.   When using the flora of your natural surroundings you also develop a better appreciation for the wonder of nature.  It is a great feeling when you can go out and enjoy what is naturally provided without even having to plant it, feed it or obsess over its care - also NOT having to buy from a grocery store.  Here are a few simple, most readily available things you can try today –
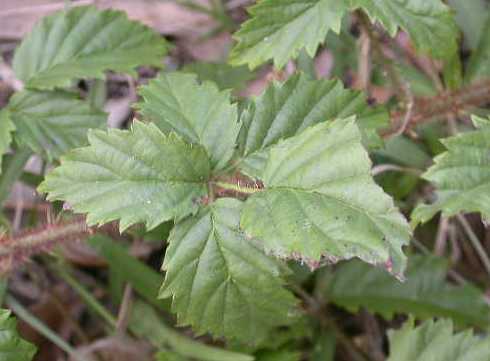
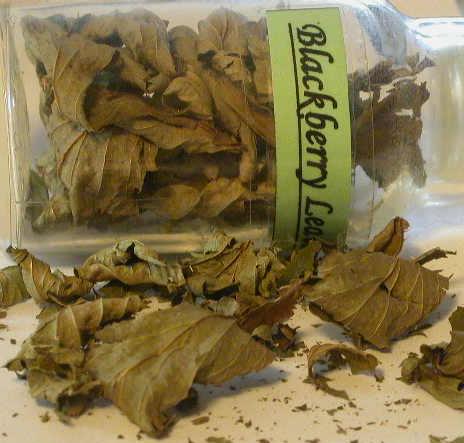
Blackberry Tea:  Pick blackberry leaves (after berries are done!) gently wash in cool water without bruising, pat dry.  If you have a dehydrator, lay leaves out on racks and dry slowly to a nice crumbly-crisp texture.  Oven users, lay leaves on a cookie sheet, set oven to about 200* and bake until dry and crumbly – not burnt!  I try to leave the leaves whole so I can use them in a tea-ball but you can also add them directly to a cup of hot water and then pour through a paper towel, coffee filter or small-hole strainer to remove the leaves.  Use about 2 teaspoons of dried leaves per one cup of boiling water, sweeten (local made/sold honey?) if desired and enjoy!   Store unused leaves in air-tight container (I use a recycled spice jar).  If dried and stored properly the leaves can be kept and used whenever you wish.  If you have raspberry growing naturally – follow these same steps.
Blackberry

Medicinal Uses for Blackberry: Tea made from the leaves, root and even bark (I have only tried and tested leaves) can be cooled and used as an astringent to treat cuts and burns, when used as a drinking tea it can sooth intestinal upsets of diarrhea and dysentery. Chew the fresh green leaves for swollen gums/throat ailments.


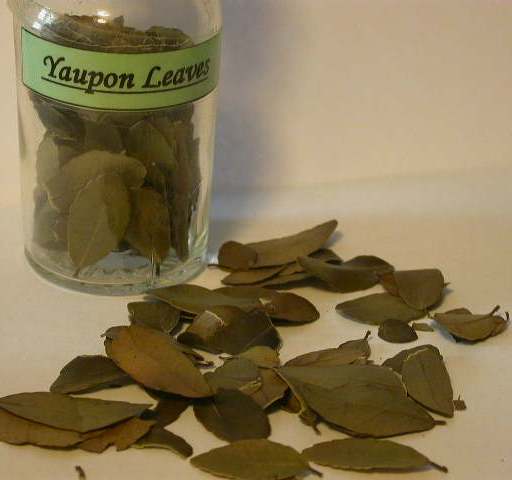
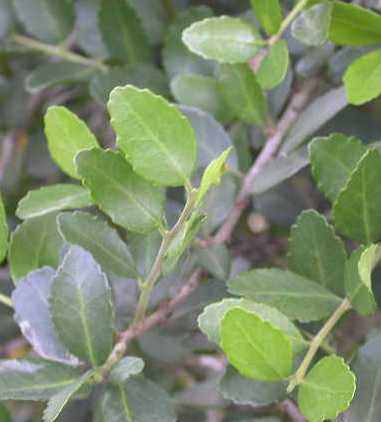
Yaupon Tea:  A very little known diamond in the rough- I was shocked to learn that this native wonder is one of only three species that are natural producers of caffeine other than coffee!  However, be very careful - it got its name for a reason – “Ilex Vomitoria” – the little red berries were used by natives as a purging agent and can cause severe sickness.   This is a wonderful plant and can be easily “tamed” by pruning and easily adapted into a yards landscape as a hedge or let it grow into an attractive winter outdoor tree to provide berries for the native bird species.  In the wild, it is an essential part of the winter diet of the deer.  Ever look closely at the outer leaves and see the ends nibbled away?  Deer.  Anyway, pick the new leaves, vibrant light green the older darker leaves can be very bitter.  It is essential to dry these, do not use raw!  Wash fresh picked leaves, blot dry and dry them as described in the blackberry preparation until they are a nice deep-golden “crunchy” brown.  They do not provide as much caffeine as coffee but it is natural and makes a nice hot cup of tea.  To me, the flavor and appearance is that of green tea.
Other uses of Yaupon Holly:  Very informative! http://plants.usda.gov/plantguide/pdf/cs_ilvo.pdf

Yaupon Holly


Blueberry leaf tea:  Not so readily available here in Texas but something I loved when I was out hunting in the mountains of the extreme North –You might have these plants growing wild or you can buy one to grow if you are in the proper zone for them to thrive.  Pick leaves, wash and steep in hot water.  No need to dry the leaves first, enjoy them fresh!   After being out all day hunting/hiking, on the way back to camp I would pick the leaves and the first thing I would do when we returned to camp was put the water pot back on the fire so I could relax with the soothing soft flavor of the berry that this plant provides.  


Medicinal uses of Blueberry: So many to list but here is a very informative page that gives them ALL!  Headache, intestinal, eyesight, gas, glaucoma, on and on and on… http://www.botanical-online.com/english/medicinalblueberry.htm
The best breakfast I have ever had is that which was made over an open campfire.  Do you have one of those percolator pots that always percolate coffee grounds into your pot of coffee?   Well, I do not have a remedy for that particular problem but I DO have a solution for bitter coffee or no milk for toning down that bitterness…eggshells.  You can save up egg shells at home to take in your camp gear or when making your campfire breakfast, after you crack your eggs open, toss the shells into the percolator (in the liquid, not with the grounds) and let ‘er brew.  Makes a smooth, creamy, non-bitter pot of camp coffee.
Hope you enjoy trying these simple natural pleasures…Whether out on the trail or on the patio, before you attack that annoying “weed” that keeps coming back…grab your regional native plant book to identify it, then research all you can, most of what you will find are the BENEFITS that it is persistently trying to provide.
As always – if you do not know for certain what it is – DO NOT EAT IT!  Some native plants may be edible but some are beneficial in completely other ways and are NOT TO BE EATEN OR CONSUMED IN ANY WAY.  If you cannot identify with certainty from your field guide book, take a sample cutting into your extension office, master gardeners, or even a park ranger for proper ID.  When in doubt, leave it alone!
Meanwhile, I will be out exploring, gathering and conjuring.  Maybe next go-round we will make our own flour (for those campfire pancakes!) from another often overlooked source…more to come!  
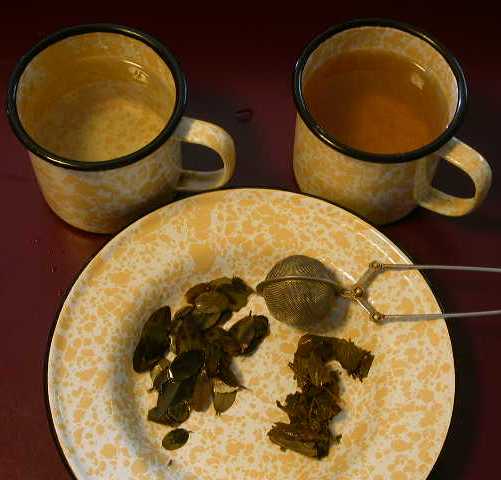
Tea Time!  Yaupon Tea on left  Blackberry Tea on right

~Rebecca McPhate TimmEarthly_Epona@msn.com


Here are some book titles on Amazon that I have read and keep in my own personal library- before buying always check first with your public library in the regional/state section!
Native Alternatives to Invasive Species
ISBN: 978-1889538778
A Field Guide to Edible Wild Plants: Eastern and central North America (Peterson Field Guides)
ISBN: 978-0395926222

A Field Guide to Medicinal Plants and Herbs: Of Eastern and Central North America (Peterson Field Guides)

ISBN: 978-0395988145

How to Get Your Lawn off Grass: A North American Guide to Turning Off the Water Tap and Going Native

ISBN: 978-1550172591

Wednesday, February 29, 2012

Edible Flowers {Guest Article}


Edible Flowers are everywhere…
When we lived in Hawaii we got to eat lots of different types flowers.. They would put flowers in drinks, salads, and even deep fried (you would have thought being from the south I would have already had this one.).. You might be saying “Yuck” but they actual taste good, many different flavors as well… I have to say that my favorite is deep fried squash blossoms “Yummy”…  FYI, there is a drawback to eating the blossoms you get no squash from the plant, after removing the blossom..
Okay, let me get to the many flowers you might run across while out in the woods..
Clover is sweet, anise-like, licorice. Raw flower heads can be difficult to digest.
Dandelions, Flowers are sweetest when picked young. They have a sweet, honey-like flavor. Mature flowers are bitter. Dandelion buds are tastier than the flowers: best to pick these when they are very close to the ground, tightly bunched in the center, and about the size of a small gumball. You can use them in salads or cooked.. (this is the easiest one to try.. everyone has them in their yard. If you put chemicals on your yard, go to a different location to pick these.)
Citrus blossoms,  Use highly scented waxy petals sparingly. Distilled orange flower water is characteristic of Middle Eastern pastries and beverages.
Sunflower,  The flower is best eaten in the bud stage when it tastes similar to artichokes. Once the flower opens, the petals may be used like chrysanthemums, the flavor is distinctly bittersweet. The unopened flower buds can also be steamed like artichokes.
Honeysuckle, Sweet honey flavor. Only the flowers are edible. NOTE: Berries are highly poisonous - Do not eat them!
Yucca Petals The white Yucca flower is crunchy with a mildly sweet taste (a hint of artichoke). in the spring, they can be used in salads and as a garnish.
 http://whatscookingamerica.net/EdibleFlowers/EdibleFlowersMain.htm
Cactus Flowers are Edible The fruits of many cactus species are edible. The juicy, purplish-red fruit of the prickly pear cactus (Opuntia ficus-indica), for example, is commonly found in grocery stores in Mexico and the southwestern United States. Few realize, however, that cactus flowers also make delicious meals and snacks. The flower buds of the barrel cactus (Ferocactus genus) were boiled and eaten in a similar manner to vegetables such as cabbage by the native inhabitants of Arizona, where these thorny plants proliferate. Barrel cactus flowers manifest in a multitude of festive colors including red, orange and yellow.
Cactus Flowers Used as Medicine
Prickly pear flowers
In addition to making wine, prickly pear cactus flowers have been employed for their purported therapeutic benefits. Author Margaret Joan Roberts, in her book "Edible & Medicinal Flowers," reveals that these warm-colored blooms are used in Mexico as a home remedy for relief from itchy insect bites and other stings and scratches. Prickly pear flowers are astringent. Like their associated fruits, they are also high in vitamin C.
Here in the south you can find Prickly Pear jelly, slices, etc…
As for cattails you can eat every bit of this plant.. The cattail is packed full of protein and other nutrients.. It is considered one of the most important wild foods you can eat… go get some and try them out…

Sunday, February 26, 2012

Survival Kit

In this video I go over the basic load out of a grab and go survival kit. This kit at the bare minimum minus the knife and magnesium fire starter cost around 15 dollars to build and will make any emergency night in the woods more comfortable. This is something that should be in a drawer or cupboard that is easy to get to and grab for any emergency or natural disaster. Just throw this bag into your backpack any time you go on a hike go hunting or fishing and if you need to make a emergency night stay you will be set. Any questions just post in the comment section and I will answer them.

Wednesday, February 22, 2012

550 cord storage.

Parachute cord storage. Probably the best way to have easy tangle free storage and deployment. I am working on a how to for tying this. It will work on other rope as well.


Monday, February 20, 2012

Some projects

Here are a couple of pictures from some projects I am working on. Comments are welcome as I am going to try and sell these on etsy to help fund this site. One is a Turks Head bracelet and the other is a key fob. On the key fob I made the top half double and the bottom half single which one would you prefer? Single or Double?

Friday, February 17, 2012

Fillet a Fish

This is a Guest Article written by my brother Corbin.

For someone in the forest near a river/lake/stream a major priority is
food. To catch a fish you need bait. In fresh water worms,bread, and
various bugs can be used. If you lack a fishing rod or net the best
substitute could be any form of string material and a stick/limb at
about 7-12 feet that wont break easily. If you lack hooks for a fish
to bite find some wood or bone, anything that can be
carved/ground/whittled down to the shape of a hook and sharp enough to
pierce the scales. If by any luck or use of manliness you find a fish
on the end of a line without a reel pull the string down to your waist
and pull as hard and fast as humanly possible. When your fish is on
the shore and dead, it's time to figure out how to skin/scale it.
first you'll need a knife that can be used to fillet the fish. Once
you obtain a knife/razor, put the blade next to the gills and push
down, Without cutting the fish in half, and slide it toward the tail.
Cut along the side of the spine without cutting off at the tail, leave
a little skin attaching the fillet and the fish together. Flip the
skin over so the meat is facing up and slide the knife along the
bottom of the meat between it and the skin. After a little
blood,sweat,and tears you have a cook-able fillet! 


If you prefer skinning the fish here is how
"Cut the skin behind the head and pectoral fins. Use pliers to remove
the cut skin from the catfish, starting at the head and pulling toward
the tail. Then, grasp the head of the fish with one hand and the body
with the other. Using both hands, break the backbone of the catfish at
the head, and then pull the head and guts away from the skinned body."
[Source: Take Me Fishing]


this is a catfish be careful for the spines in their fins


Wednesday, February 8, 2012

Next video ideas

Taking votes for my next video. Do y'all want another bracelet video or do y'all want a how to on something else?

Tuesday, February 7, 2012

Survival Bracelets Vid1


Here is the first video of the series for uses of the survival bracelets. Any questions feel free to post and I will answer to the best I can.